Next主题配置
主页设置
头像设置
修改字段avatar
- 直接放上头像的url
- 图片存放在
D:\Personal\Blog\Hexo\Cx330\themes\next\source\images目录下,配置为avatar: /images/avatar.png
菜单设置
- 配置文件中找到
menu,取消相应的注释,点击会报错Cannot GET /tags/,需要新建页面 hexo new page "tags"会在source目录下新建`tags文件夹- 编辑
index.md,增加type: tags
圆角设置
在hexo目录下的
source文件夹里新建_data文件夹,进入,再新建variables.styl文件,增加代码:1
2
3// 圆角设置
$border-radius-inner = 20px;
$border-radius = 20px;此代码使用
stylus语言编写,stylus是一种CSS预处理器进入next主题的配置文件,找到
variable: source/_data/variables.styl,取消注释
背景设置
根据canvas_nest的官方教程进行配置:
配置文件找到
footer: source/_data/footer.njk,取消注释- 那么新建
footer.njk文件,增加代码:
1
<script color="0,0,255" opacity="0.5" zIndex="-1" count="99" src="https://cdn.jsdelivr.net/npm/canvas-nest.js@1/dist/canvas-nest.js"></script>
- 还有一种方法是把
canvas_nest.js文件下载到themes/next/source/js/目录下,src调整为src="/js/canvas_nest.js"
由于官方教程提供的文件名是
footer.swig,特地去查了一下njk和swig两个后缀:.njk和.swig都是模板引擎文件,用于创建动态生成内容的模板,通常用于Web开发,生成最终的HTML页面- 那么新建
阅读进度条
- 修改
back2top - 颜色进度条
reading_progress
添加运行时间
在themes/next/layout/_partials/footer.swig末尾加入代码:
1 | <!-- 网站运行时间的设置 --> |
游客统计设置
修改busuanzi_count
代码块设置
修改highlight theme
修改标签符号
进入themes/next/layout/_macro/post.swig,找到post-footer,修改#为<i class="fa fa-tag"></i>
评论系统
暂时不想加入评论系统
嵌入统计工具
见官方文档
图标设置
Font Awesome(简称FA)是一个广受欢迎的图标字体库(像文字一样使用它),用于增强视觉效果。可用通过简单的html代码或css类名在网页上添加各种图标,而不必依赖于图像文件。国内镜像
可以使用前缀fa和图标的名称来添加FA图标
等学了前端之后再补充吧
RSS
RSS(Really Simple Syndication)是一种用于订阅web内容的标准格式
文章配置
Front matter
添加updated值作为更新时间
文章置顶
插件
Hexo本身并没有内置文章置顶的功能,需自行安装。但Hexo本身有一个对文章进行排序的组件hexo-generator-index,卸载之后安装可置顶排序组件hexo-generator-index-pin-top
1 | npm uninstall --save hexo-generator-index |
此时根目录下的package.json文件也发生相应改变
在想要置顶文章的front-matter添加top: true即可
图标
但这样仅仅具有置顶效果,不具有区分性,因此加入图标
进入themes\next\layout\_macro找到post.njk文件,找到<div class="post-meta-container">,添加:
1 | {% if post.top %} |
草稿功能
hexo new draft "title"在_draft文件夹下新建草稿文章,hexo g不会将其编译到public文件夹下,想要预览,运行hexo s --draft,hexo publish "title"将草稿发布为正式文章
鉴于以后写文章都要打草稿,所以修改default_layout为draft
问题
无法显示
打开文章后白屏,解决:在next主题配置文件中搜索motion,将enable值改为false
然后文章得以正常显示,但是显示了一半,从一个表格开始,下面的内容都消失了。是因为表格的内容有问题:
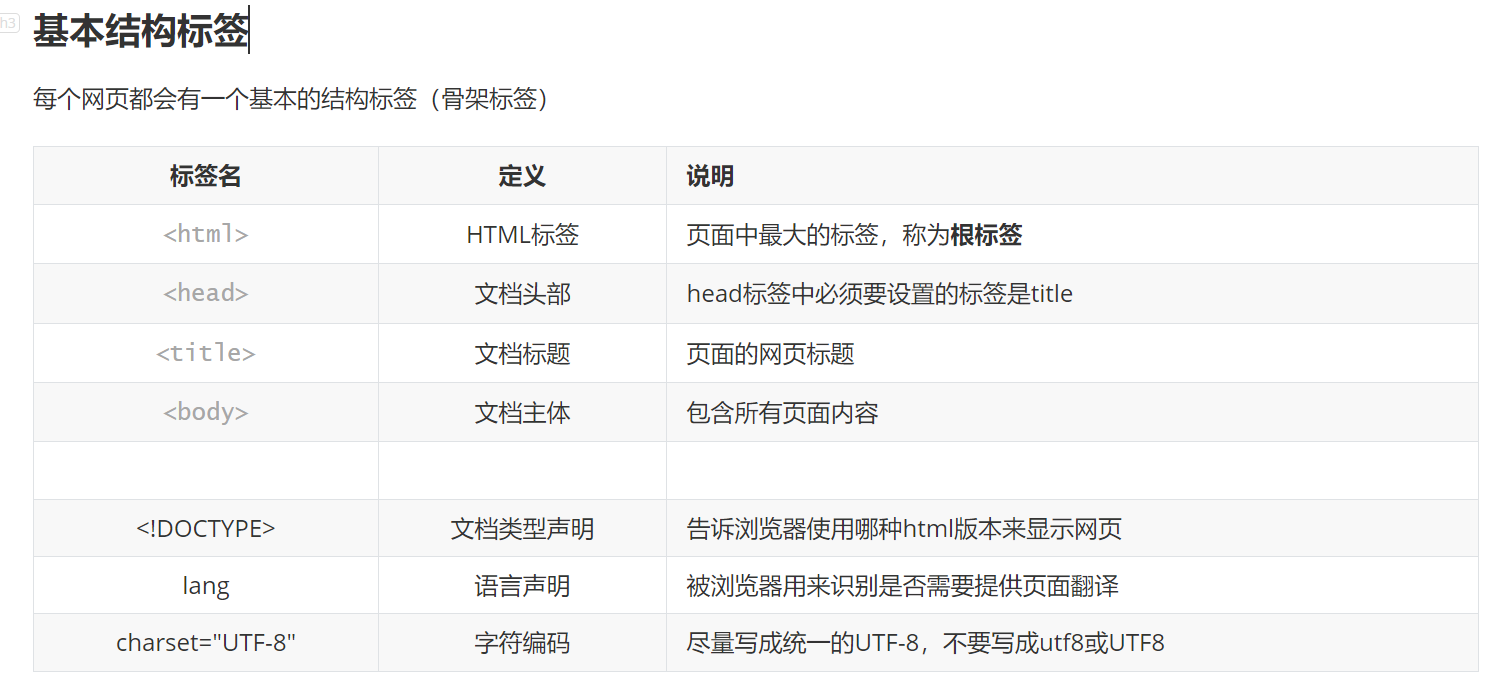
想要记录html标签,写成<html>,会导致页面出问题,后面的内容直接被截断。。所以直接记成html就行,或者加个代码块